The shock cord is an extremely important component of your model rocket. While not visible while the rocket is assembled, it plays a key role in the recovery of the flight. So what is a model rocket shock cord and what does it do?
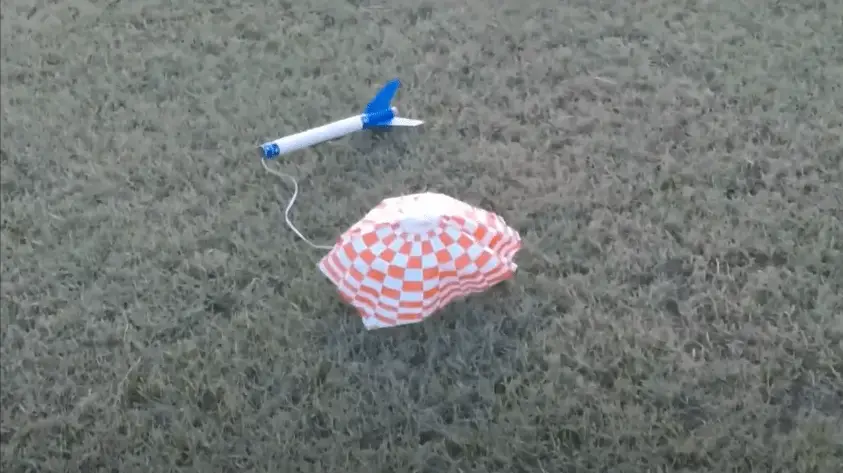
The shock cord connects the model rocket’s body tube and nosecone once the parachute has been deployed. It is typically an elastic material that measures approximately three times the length of the rocket’s body tube and gently withstands the force of ejection and parachute opening.
Using the right length, material, and attachment method will ensure that your shock cord is as effective as possible. Here are some tips to do so!
Are you still using the standard Estes controllers for your launches?
We just built our own beautiful launch controllers that make launches SO much more fun, and we documented EVERY single step and item purchased and put it into a step-by-step course that teaches you how to do the exact same thing.
Click here to learn more about how you can build your own launch controllers!
What is a Model Rocket Shock Cord?
The shock cord is typically an elastic piece of fire-resistant material that connects the nose cone and the body tube of the model rocket.
It keeps the nose cone attached to the rocket when it is separated and after the recovery system of the rocket has been deployed.
In one of our launch videos where we are launching the Estes Athena, you can see the shock cord connecting the body tube of the rocket to the nose cone and parachute of the rocket around the 4:50 mark:
Side note, if you aren’t already subscribed to The Model Rocket YouTube channel, would you consider doing so today? We have a ton of content planned out for the channel and if you subscribe you won’t miss any of it!
The Best Length for Your Model Rocket Shock Cord
The length of your shock cord is highly dependent on the size, weight, and motor of your model rocket.
It is suggested that rockets that weigh less than one pound, use either A, B, and C motors (all of which are typically between 18-24mm, these are known as “low-power” motors – see our article on Model Rocket Engine Sizes and Classifications for a full walkthrough), and have a parachute of 1 foot or less, would do best with a shock cord of approximately 2 feet long.
For larger rockets with up to F or G motors, you’ll not only need to increase the length of the shock cord and the material as well.
A Tip for Determining the Best Shock Cord Length for Your Model Rocket
The consensus on determining the length of the shock cord for your model rocket is that it should be three times as long as the body tube of the rocket itself.
As previously mentioned, the two primary things you need to keep in mind when constructing your shock cord are the two forces it is built to withstand: the force of the components dispersing at ejection, and the force of the opening of the parachute. With larger rockets these two forces also become larger, which necessitate a longer shock cord.
The Best Materials for a Shock Cord
The typical materials used to create a shock cord are elastic, rubber, nylon, and Kevlar. Out of all of these materials though, elastic and Kevlar are by far the best and most commonly used.
Elastic Shock Cords
Elastic is great due to its low price and strong ability to absorb the shock of parachute deployment. The problem with elastic is that over time it can be damaged by the hot gas produced by the ejection charge. You can construct an elastic shock cord from a rubber band alone or as a bungee cord – an elastic cord enveloped by nylon, polypropylene, cotton, etc.
Note that you should always avoid elastic that is coated with synthetic materials, and instead use cotton-coated elastic. This is because the chemicals necessary to create bungee cords with nylon, polypropylene and more, may introduce chemicals into the engine reaction (since the shock cord is positioned on the inside of the rocket above the engine) in the event of a malfunction and cause further damage.
Inappropriate materials on the outside of your elastic shock cord can also increase its vulnerability to UV light, abrasion, water, mold, mildew, and more.
Lastly, even though a larger diameter strengthens your elastic shock cord, it will also make it less flexible and harder to work with. The only real modification you should be making with an elastic shock cord is the length and possibly increasing or decreasing the elongation rating – this determines the stretchiness of your cord.
You don’t have to necessarily construct your own shock cord either as Estes (and other manufacturers) sell them pre-made along with their mounting packs (here is a link to Amazon for Estes’ base kit of shock cords).
Most, if not all, Estes rocket kits will also come with the parachute and shock cord as well. Be sure to look at “what’s included” before purchasing a rocket to ensure you have all of the necessary components. You can see all of our favorite Estes beginner kits at our article: Best Model Rockets for Beginners.
Kevlar Shock Cords
Kevlar, on the other hand, has an advantage in its fireproof nature, however, its disadvantage is that it is not as malleable as elastic. It is also more expensive than elastic, but it’s durability readily makes up for these slight inconveniences.
When used in a shock cord, Kevlar is typically used to anchor the shock cord inside of the rocket and then elastic is used as the actual shock connecting to the nose cone.
Kevlar shock cords are specifically attached to the engine mount, and a thread of elastic is tied to the end of the Kevlar cord and tied to the nosecone. Another big advantage to using Kevlar over solely elastic is in its strength (Kevlar is several times stronger than even steel). More powerful rockets tend to end up using a Kevlar and elastic shock cord system for strength and durability.
For smaller model rockets, it is ideal to use 60lb Kevlar, which measures 0.016in in diameter. One hundred (size 300) to one-hundred-fifty-pound Kevlar is the standard for low power rocketry, and 400lb (0.060in in diameter) should be used only for larger model rockets. (Source: NAR)
How to Attach the Shock Cord
The body of the rocket is attached to the nose cone via the shock cord. To effectively attach your shock cord to the body of your rocket, here is a video that outlines the simple steps:
Here’s our own video going through the assembly of the Estes Alpha III (link to read reviews on Amazon), and at the 5:55 mark we show the installation of the shock cord from start to finish:
Summary of Shock Cord Construction
The shock cord is a fairly simple component on your rocket, but it is an incredibly important part of the recovery system. It is always a good idea to double check the fastening and integrity of the shock cord prior to any launch to ensure it is functioning properly.
Be sure to thoroughly plan your flight ahead of time to ensure that you choose the right length and components for your shock cord so that you can experience the best flight possible.