Is today the day you’re designing or constructing your first model rocket? When you use the best materials, making a model rocket can be a rewarding and low-stress experience. What is the best material to make a model rocket?
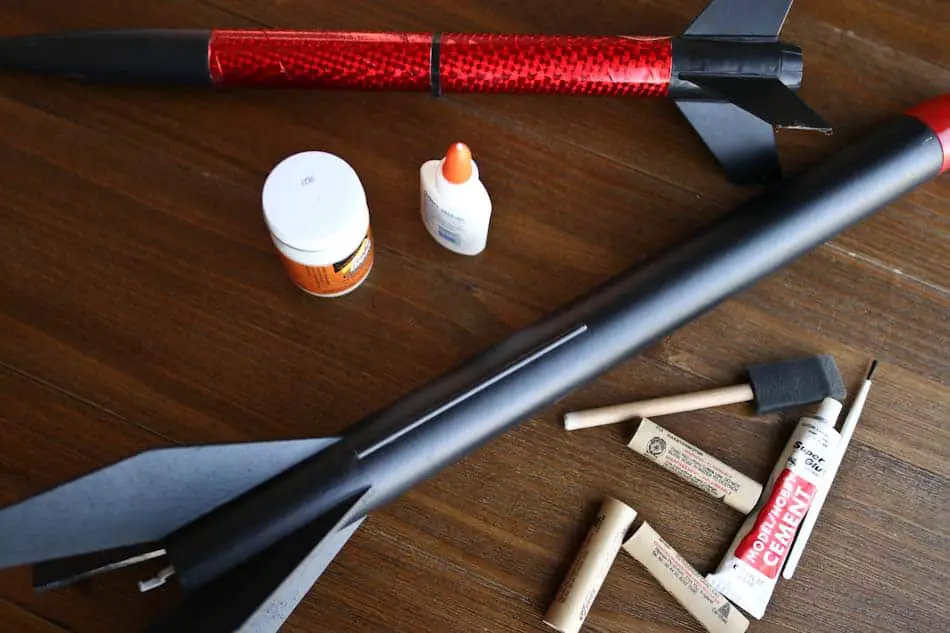
Small model rockets are best made from cardboard or plastic for the body, balsa wood for the fins and nose cone, paper or cardboard for centering rings and bulkheads, cotton coated elastic for shock cords, cardboard for launch lugs, and nylon and Kevlar string for the parachute.
Don’t forget other supplies like engine hooks, sandpaper, and glue.
These are a few of the best materials for making a model rocket, but there are other suitable materials as well. We’ll list some of your other options below. We will also discuss why we have selected these particular materials, where you can find these rocket-building materials, and how you can put your materials together to form a model rocket.
Are you still using the standard Estes controllers for your launches?
We just built our own beautiful launch controllers that make launches SO much more fun, and we documented EVERY single step and item purchased and put it into a step-by-step course that teaches you how to do the exact same thing.
Click here to learn more about how you can build your own launch controllers!
What are some other appropriate materials for making a model rocket?
There are plenty of different materials that you can utilize when building your model rocket. It is important to keep a list like this on hand during the building process. If one of your materials doesn’t work the way you thought it would with your unique rocket, you can give something else a try.
Here are several material selections, part-by-part, that can produce a successful model rocket.
| Part/Supply | Material Options |
| Body | Cardboard, thin plastic, manila folder, commercial tubes Thicker wood or composite materials for higher-power engines |
| Nose cone | Plastic, balsa wood, hardwood, fiberglass, Styrofoam |
| Fins | Balsa wood, plastic, fiber glass Plywood or 3-D printed fins for higher-power engines |
| Centering rings/bulkheads | Wound paper, plywood, cardboard, balsa wood |
| Shock cord | Commercial Kevlar shock cord, sewing elastic, rubber, nylon |
| Launch lugs | Cardboard, paper, plastic, brass, commercial launch lug |
| Engine hooks | Flat wire from old window wipers, spring steel, commercial engine hooks |
| Parachutes | Pre-made parachute material, trash bags, plastic shopping bags, mylar, nylon |
| Glues | Wood adhesive white glue, yellow glue, plastic cement (for plastic parts), hot glue |
Why are these the best materials to make model rockets?
What makes some materials preferable to others in model rocketry? To learn more about the reason why we recommend the following materials for your model rocket, here’s a great resource by Phil Charlesworth.
Cardboard or plastic for the body: A model rocket must be lightweight to fly, but flimsy materials would be destroyed in flight. High-quality cardboard or a sturdy but thin plastic would work well for the body tube.
Balsa wood for the fins: If you’re getting into model rocket building, it’s important for you to learn that balsa wood will be your best friend. It is durable but still thin and lightweight, making it a great choice for the rocket fins.
Balsa wood for the nose cone: You will find that if you browse commercial nose cones, many of them are made with balsa wood. This wood can be molded into a round aerodynamic shape to form the perfect nose cone for your rocket. Note that there are also pre-made plastic nose cones widely available from sites like Apogee.
Cardboard or paper for centering rings and bulkheads: It’s important to remember that many of the materials you choose will depend on the power level of your rocket. For lower-power beginner rockets, find a good quality card or paper for your centering rings and bulkheads. For medium-power rockets, you’re better off with plywood.
Cotton coated elastic for shock cords: We recommend elastic because not only is it cheap and widely accessible, but it can be used to create a reliable shock cord. Be aware of what substances your elastic is coated in – cotton coated elastic is your safest bet.
Cardboard for launch lugs: For a small model rocket, cardboard is perfect for the launch lug. For mid-size model rockets, you will probably want to procure a stronger material. Plastic or brass would be the next step up from the cardboard.
Nylon and Kevlar string for parachute: Even if you are using a kit to construct your model rocket, you might consider doing a DIY parachute.
According to Phil Charlesworth of UKRA (The United Kingdom Rocketry Association), “the parachutes that come with model rocket kits … are not good quality and tend to burn or tear easily.” You could simply grab a plastic shopping bag to design your parachute, but for a truly reliable chute, we recommend windproof nylon and Kevlar string.
Concerning DIY materials for building the rocket itself, this is a helpful list, but keep in mind that this isn’t an exhaustive list of everything you will need to build your model rocket. Explore the list under the next section, “What are the parts of a model rocket?” to make sure you’re not forgetting anything when you go model rocket supply shopping.
What are all of the parts of a model rocket?
If you need to purchase materials for your first model rocket, it is important to have a thorough understanding of all the parts of a model rocket. Check out this NASA illustration for an image depicting all of the parts of a model rocket:

The Nose Cone
The nose cone is usually a rounded or parabolic shape. For larger and faster rockets, the nose cone should be slender and conical. The purpose of the nose cone on the tip of the body is to make the rocket aerodynamic, and to release the parachute.
The Payload Compartment
The payload compartment is just an extension of the body, and it is optional. It can carry experiments, cameras, etc. It is separated from the body by a bulkhead or centering ring.
Bulkhead
The bulkhead keeps hot gases from leaking into the payload compartment. The bulkhead protects the payload within.
Centering Rings
Your centering rings are used to center smaller tubes, such as your engine mount, inside the body tube.
The Body Tube
This is the body of the rocket, which contains the parachute and shock cord. The body tube is usually a cardboard cylinder.
Fins
Fins are little wings attached to the body tube to make it more stable during flight. They help the rocket to fly straight.
Engine Mount
The engine mount, or motor mount, lies within the back of the body tube. It contains the engine, the engine hook, and the centering rings.
The Launch Lug
This hollow tube is glued to the rocket around the point of balance. It encourages the rocket to accelerate upwards.
Shock Cord
The shock cord is an elastic connected between the nose cone and rocket fins. It allows the rocket to decelerate after launch, and it helps free the parachute. The shock cord also prevents various parts of the rocket from colliding during launch and descent.
Recovery System
The recovery system is the parachute, streamer, or other recovery device. Of course, the purpose of a parachute is to slow the fall of the rocket, while a streamer will help the rocketeer keep track of the rocket as it floats to the ground.
Other tools you want on hand while making a model rocket
Whether or not you have a good grasp on the parts and function of a model rocket, you’re going to want a list of practical supplies for when you begin the building process.
You may not need every one of these supplies, but most of them are highly useful, if not totally essential to your model rocket building experience.
Sanding block
You will absolutely need a sanding block throughout the construction of your model rocket. Every component of your rocket should be sanded into an aerodynamic shape.
You will use your sanding block on the rocket fins, the body tube, and the nose cone. You will probably also find other practical uses for it throughout your project. It is especially helpful for shaping balsa wood.
Of course, you will need sandpaper with your sanding block. Find out what your sanding block holds and buy the appropriate sandpaper.
400 grit is a dependable paper for building a small model rocket. If you are using plywood or other heavier-duty materials, you may be better off with a 320 grit or rougher.
Masking tape or painter’s tape
You can really use any kind of tape that works best for you while you paint your model rocket. Make sure your tape won’t peel off the base color, but still gives you a noticeable line so you do not paint over it.
Glue
Glue is obviously a necessity for putting your model rocket together. What type of glue is best for constructing a model rocket? See our post on the best model rocket glue – it isn’t super glue!
You want to pick a glue that you are comfortable with. Super glue can be frustrating in inexperienced hands. It’s important to note that super glue can also become brittle over time.
A regular white glue can be all you need to build your model rocket. You might also use a yellow glue, or a plastic cement if you are using plastic materials. And don’t forget about that airplane model glue that you can find in hobby stores.
Knife and blades
A hobby knife and blades are critical tools for building a model rocket. A standard hobby knife will work just fine. You want to have some blades on hand to make sure your knife is sharp and effective.
Ruler
Precision is key while building a model rocket. Have a straight edge ruler on hand. We recommend a ruler with some kind of grippy material on the back so that it will sit still while you take measurements.
Wood Filler
Carpenter’s wood filler can help you make the most of your balsa wood and shape your parts exactly how you envision them. It also preps the wood for paint. Mix some of your wood filler with water until you get the consistency you need for your project.
Damp cloths
Have a few wet rags on hand. You’re going to find them extremely useful for removing glue and paint from your hands and your rocket as you put it together!
Scissors
Don’t forget to pull out your endlessly useful scissors. They can assist with much of your model rocket construction, such as cutting out the shock cord mount.
Writing utensil
Pencils are preferable as you mark points on the rocket during construction.
Where to find the best model rocket building materials
You can find all of these model rocket building materials at Hobby Lobby or other hobby supply stores near you. Other viable hobby stores that may be closer to you include Michaels, HobbyTown and JOANN. Many towns have their own local hobby stores as well.
Many of these materials can be found at Walmart and other stores with hardware, craft, and outdoor sections. Outdoor specialty stores like Ranch & Home or Lowe’s will also carry some of the supplies you will need.
Of course, in this world of convenient online shopping, you can also find 100% of your model rocket building materials online. This can be helpful if you want to compare your options and prices before buying.
Use this Amazon Shortcut link to pull up search results for model rocket building supplies and explore the model rocket materials Amazon has for sale. There are also other rocket-exclusive sites you can find with a quick Google search.
How to construct a model rocket using the best materials
Building model rocket kits are the easiest way to do your first rocket, but if you are doing your DIY rocket with the aforementioned materials, here’s some help to send your model rocket flying!
- Design your rocket. Use someone else’s model rocket instructions or design your own. Designing your first model rocket is another topic entirely, but don’t forget to ensure the Center of Pressure is below the Center of Gravity.
- Do the prep work. Here are the basic steps that you should complete before you begin building.
- Choose your body tube and nose cone size. Smaller rockets will use BT-20 or BT-50, medium rockets need BT-50 or BT-55, while large rockets require BT-60 or BT-80. Choose wisely to guarantee your rocket’s stability.
- Select your recovery system. Small rockets should utilize a streamer – there’s really no need for a parachute to slow it down upon descent. Medium rockets can use a parachute or streamer, and large rockets should always have a parachute.
- Consider the rocket fins. Rocket fins are another important factor in the stability and success of your model rocket. Place the fins close to the bottom and think about how far they should come out from the body of the rocket. Fin span should be about 1x the tube diameter, but you may choose to use a model rocket design simulator to guarantee your rocket fins will produce a stable result.
- Go shopping. Write up your shopping list based on your particular model rocket. If you are doing a DIY rocket, remember that you may already have some of the materials and supplies you need at home (such as elastic, glue, cardboard, and shopping bags).
- Get an idea of a basic list. If you need a starter model rocket shopping list, check out our final section below: “Complete shopping list for building a model rocket.”
- Create your body tube. Cut out your cardboard, paper, or manila to the correct length and roll the sheet into a tube. Make sure it is smooth and wrinkle-free. Tighten the tube until it is exactly the right size to accommodate the rocket engine.
- Start gluing. You can use tape or rubber bands to keep your rocket bodily momentarily together, but then use glue to permanently seal the rocket body. We recommend using a paint brush or another applicator (you could even tape some paper to the top of a pencil to form a brush) to distribute the glue with accuracy.
- Dry and clean up. Mark the bottom and the top of your body tube so you know which way is “up” later. Allow your rocket to dry overnight. Once dry, you should clean up its shape with your craft knife, ensuring it is aerodynamic.
- Create the engine mount. Take your engine tube and measure out where you should cut your slits according to your design. Use your craft knife to make slits around the tube based on your markings.
- Insert the engine hook. Apply glue and insert the right angle of the engine hook into the correct slit, then slide your elastic or other shock cord over the engine mount tube and engine hook. Apply glue inside the engine mount, on the opposite side of the hook, and insert the engine block into the tube.
- Prepare your centering rings. Cut the centering rings out and slide them over the engine mount tube. Apply glue to both sides to secure the centering rings.
- Build your rocket fins. Cut your rocket fins out of your balsa wood based on your design measurements. Sand down rough edges with your sanding block.
- Attach the fins. Mark the sides of your body tube, glue your fins together, and attach them to the rocket carefully using your glue brush. Hold tight with your fingers, or recruit some help. Sometimes it may feel like you don’t have enough hands to build a model rocket!
- Place the engine mount. Apply glue to the edges of the centering rings, then slide the engine mount through the bottom of the body tube. Add some glue between the rings and the tube to secure placement.
- Adhere the fins. Practice aligning your fins correctly with the rocket body first, then bring out the glue. Glue one fin along the marker nearest the bottom of your rocket, making sure it is square to the body tube. Hold in place for several seconds before releasing, then repeat with each fin until all are in order. Allow to dry overnight.
- Install the launch lug. Make sure it is aligned with the body tube.
- Place the shock cord. Get your cotton-coated elastic shock cord and place it inside the body tube, about an inch and a half down from the top, and glue and hold.
- Build the recovery system. Prepare your parachute or streamer using your modeling knife. Pull it through the hole in the nose cone and secure. Tie the unattached end of the shock cord to the nose cone (it should be placed towards the bottom of the nose cone).
- Install the parachute or streamer. Once the recovery system is properly folded and prepared, place wadded up paper into the top of the body tube and insert the recovery system. For more reading see our article on Model Rocket Parachutes vs. Streamers.
- Place the nose cone on top of the body tube. Pack the shock cord into the top of the body tube and then secure the nose cone to the top of the body.
- Paint your rocket. Use enamel paints or spray paint. In most cases, you will want to prime your rocket first. For more reading see our post on the Best Paints for Model Rockets.
- Test your stability. You can use the swing test to find out if your rocket is set up for success. Use the largest engine you plan to use in the rocket, and balance the rocket on your finger horizontally. Tie a string of five or six feet around the rocket, securing it with tape. Swing the rocket around your head, and if it flies straight, your rocket is stable and ready to go.
- Test launch time. What’s the difference between a test launch and a regular launch? You want a very wide berth with few to no people, cars, homes, or belongings present, since you have no concept of how far your rocket will fly. Now get that rocket onto your launching pad and see how she flies!
- Launch day. Make any needed changes to your rocket before taking it for its first real launch. Once your rocket is ready to roll, invite your friends and family to see the magic!
Here are some other resources with step-by-step guides that can help you assemble your model rocket:
Complete shopping list for building a model rocket
Lists make everything simpler. When I go shopping for anything, especially something I’m unfamiliar with, I need a good list. There’s nothing worse than arriving home and realizing you forgot one of the things you needed most.
Here’s your DIY model rocket building shopping list:
- Rocket engines
- Engine mount tube
- Engine hook
- Balsa wood
- Lots of high-quality cardboard
- Garbage bag or nylon
- Kevlar string
- Elastic or shock cord
- Pencil
- Ruler
- Rubber bands
- Compass
- Duct tape
- Scotch tape
- Painter’s or masking tape
- Craft knife
- Sanding block and sandpaper
- Scissors
- Glue brush
- Glue
- Needle-nose pliers
- Launch pad or rod
- Ignition circuit
- Primer
- Paint
Keep in mind that your rocket-building needs will vary based on your design, preferences, etc., but this is a great place to start.
Here are a few additional points of information that might be helpful while you are picking out your supplies.
Rocket Engines
How do you pick out your engine? Every rocket design has different requirements.
You’ll want to start with a smaller engine if you are a beginner. Keep in mind that a “B” size engine will go twice as high as an “A” engine, a “C” goes twice as high as a “B” engine, and so on. For more reading see our Complete Guide to Rocket Engine Sizes and Classifications.
Balsa Wood
Balsa wood is an excellent material for model rocket building because it is both tough and lightweight. You can use balsa wood for the fins and the nose cone, as well as other parts of your rocket if you so choose.
Cardboard
Cardboard is your best friend in amateur model rocket building. Choose a high-quality cardboard for the body tube, launch lugs, centering rings and bulkheads.
You can substitute cardboard in many cases with a thin and durable sheet of plastic. You can also use high-quality cardstock or paper in some instances.
Garbage Bag or Nylon
At first glance, you may wonder how a garbage bag could be interchangeable with nylon! You’ll need a recovery system, and a garbage bag, trash bag, or nylon can be suitable for constructing a parachute. You could also use a streamer instead of a parachute.
Kevlar String
Kevlar string is the best choice for constructing your parachute and can also be useful throughout your project. It is stronger and more resistant to heat than most other string.
Elastic or Shock Cord
You can buy a shock cord or use elastic to design your own. Cotton-coated elastic is usually preferable to elastics coated with synthetic materials.
Glue
There are dozens of varieties of glue, and many of them will work well for your model rocket project.
Regular white glue works fine. Super glue or hot glue work well, but they can be tricky to use. Plastic cement is perfect for plastics, but model aircraft glue is always an excellent choice!
It’s going to be rewarding seeing your project skyrocket into the air knowing you used the right materials and put in the hard work. I hope your first model rocket exceeds your expectations!
Build Your Own Launch Controller
Don’t forget! You can ditch the stock controllers and confidently build your own from scratch using our step-by-step instructions and exact materials list! We promise this will make your launch experience 10x better, and using our course License to Launch you can be 100% confident you’ll be able to finish this project and be super proud of what you’ve built! Here’s a sneak peek below.