Model rockets are a popular hobby among users of all ages. They are exciting to launch, allow you to build specific skills, and provide scientific educational value. If you’ve never seen a model rocket being built, you may just think it requires pushing a button for launch. It actually is much more detailed, requiring great attention to detail and proper construction for success.
How Do Model Rockets Work?
After constructing a rocket using lightweight materials, an engine and recovery system are placed inside. An engine is ignited by electricity via a launch controller, creating thrust. The rocket is propelled into the air and reaches a peak altitude before a parachute recovery system is ejected from the rocket and returns the rocket safely to the surface.
Model rockets are fun and safe to use given that proper safety precautions are taken and construction is sufficient. This article dives into the components that make a model rocket, what typical flight looks like, navigating engines, and all you need to know about getting started with this hobby.
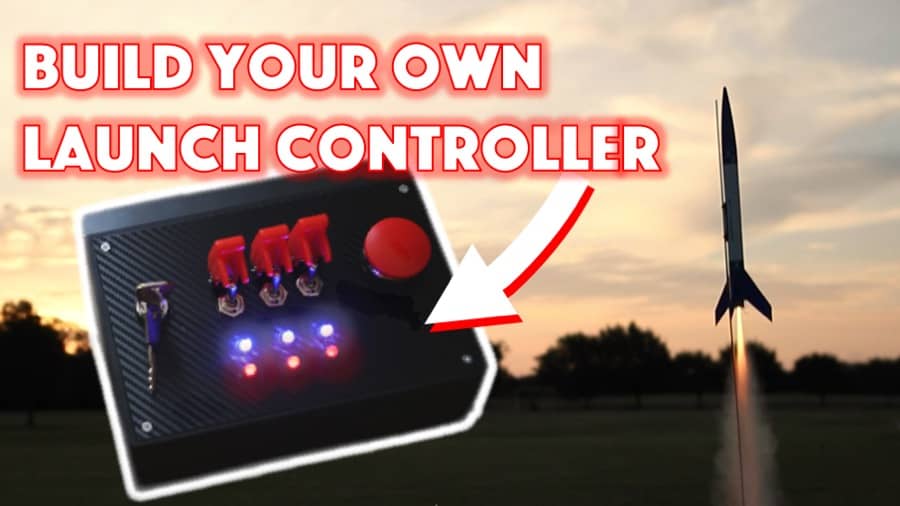
Are you still using the standard Estes controllers for your launches?
We just built our own beautiful launch controllers that make launches SO much more fun, and we documented EVERY single step and item purchased and put it into a step-by-step course that teaches you how to do the exact same thing.
Click here to learn more about how you can build your own launch controllers!
How Model Rockets Work
Model rockets require similar knowledge to that of the large rockets you see NASA launch into space. While model rockets are much simpler, they incorporate similar scientific principles related to physics and chemistry. We’ll go through all the science you need to know when building your rocket, but in a simple way.
Components of a Rocket
Model rockets may seem to have a lot of parts, but they all serve important functions for a successful launch. For simplicity, let’s divide the rocket into three parts: outer structure, what we find inside, and necessary accessories.
Body Structure
Model rockets vary in design, but all have similar components that allow them to be aerodynamic:
- Body tube: This is the long cylinder-like structure that makes up the majority of the rocket. It holds the engine and recovery system and is typically made of strong cardboards.
- Nosecone: The nosecone serves to cut through wind and keep the rocket aerodynamic after lift-off. It is removable and connected to parachute lines for slow and safe recovery. Usually made of balsa wood or plastic, it is put in the body tube before each flight and can be solid or hollow.
- Fins: They provide stability for the rocket and are usually made of balsa wood or plastic (plastic is typically used for more entry-level rockets). There is a direct correlation between the fin assembly and performance, as they must be secured and aligned.
- Launch lug: Small cylinders that are attached to the outside of a rocket. They are used to hold the rocket along a rail or rod on the launch pad. This ensures safe and straight lift-off as you can control the angle of launch.
Inside the Rocket
The components inside the rocket are the most important as they are what is responsible for powering the rocket and bringing it safely back to the ground.
- Engine: Model rockets use single use solid fuel engines for safety. They are made of fuel and an oxidizer, which combine to form a solid propellant. They burn to power the rocket once exposed to a heat source.
- Engine mount: Does not move within the body of rocket and holds the engine firmly in place. This aims to separate the engine from the rest of the rocket and prevents engine from moving/destroying the other inner components.
- Igniter: Usually thin wires that connect to the engine to conduct electricity from launch controller and then heat the engine.
- Recovery system: Most commonly in the form of a parachute or streamers, they are ejected from the rocket after peak altitude to bring it safely back to Earth. They are usually made of thin plastic sheets.
- Wadding: To protect the plastic recovery system from melting, toilet-paper like wadding material is used to separate the recovery system from the burning engine.
- Shock cord: Keeps all materials together during recovery. A cord is tied to the nosecone and the body of the rocket to ensure no parts are lost after the nosecone is ejected to initiate recovery system.
Necessary Accessories
The rocket itself must be supplied with energy to burn the engine. Model rockets are powered by electrical volts.
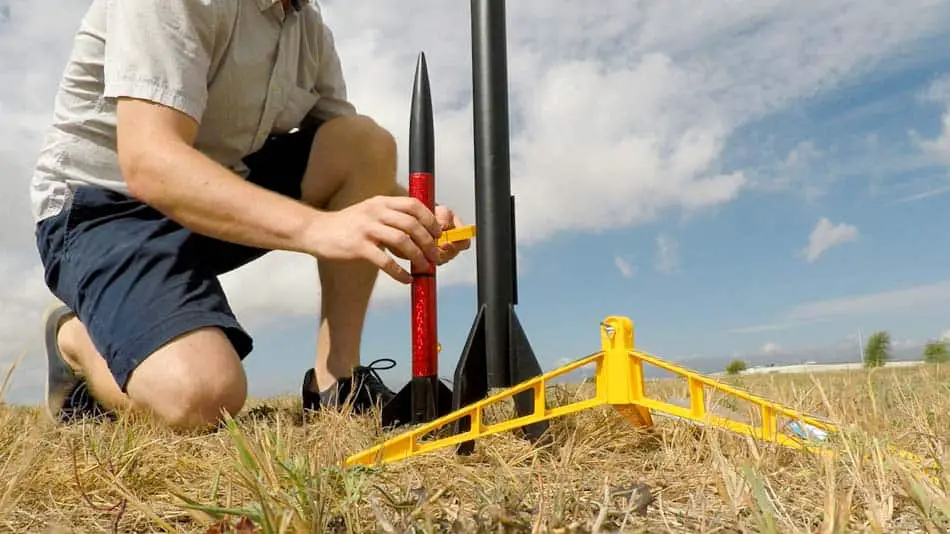
- Launch Pad: With 3-4 legs for stability, it is a metal surface with a rod or rail centered on it. This rail is used to hold the rocket up and ensure upward flight. It also has a deflector plate to prevent damage to the pad once the engine ignites.
- Launch Controller: Electricity-driven control that is connected to igniter in the rocket by wires and clips for engine burn. Electricity volts are supplied to the igniter to initiate burning process.
Building a Model Rocket
Before any flying can take place, most of the time spent on model rockets is reserved for building. Other than Ready to Fly (RTF) rockets, most require assembly. For beginners, Skill Level 1 rockets are best. As you become more experienced, increasing the level of rocket difficulty will impact the assembly and more advanced techniques needed to build.
Every rocket will be slightly different in construction, even across similar skill levels. Most beginner models should take you around 2 hours to construct, dependent on difficulty, and possibly more time to allow glue and adhesives to set.
- Have all necessary materials: Rocket kits should include body tube, nosecone, fins, parachute, and paint if required. You will need to purchase engine, starter, and wadding separately. Tools such as pencils, scissors, sandpaper, glues, and brushes will also need to be obtained. Kit instructions should detail necessary tools and items needed.
- Prepare Fins: Cutting and sanding may be required depending on difficulty. Practice aligning fins and marking placement on tube. Attach fins with glue.
- Place Engine Mount: Make sure engine mount is in place to hold engine. Glue edges to ensure security.
- Attach Launch Lug: If not already attached, place launch lug towards the top of the body tube.
- Attach Shock Cord: Glue shock cord inside of the body tube. Set heavy item over area to ensure tight hold during drying.
- Attach Recovery System and Nose Cone: Slip the designated loops on parachutes through nosecone for secure attachment. Then insert parachute cords through these loops to keep both attached. Tie shock cord to nosecone. All three will be attached during recovery.
- Insert parachute into body tube: Place 7-8 sheets of wadding in loosely, closest to engine. Then insert parachute by flattening it and folding in half. Roll the parachute from both sides carefully and wrap lines around this. It is important to keep parachute from tangling so it can easily release during recovery.
- Paint: If you wish you paint your rocket, save this for last. Let dry and then fly! See our article on Best Paints for Model Rockets.
Some models may require additional steps such as sanding. Expect to spend more time building and preparing for more advanced models rockets.
Flying A Model Rocket
Now that you know how to build the rocket, let’s fly! This is a step by step guide into the flight path so you know what to expect for a successful launch.
- Launch
- Powered Ascent
- Coasting Flight
- Ejection Charge
- Descent
- Recovery
Unlike large rockets, model rockets maintain their weight throughout flight as the burned material is not significant in relation to overall weight. Model rockets rely only on aerodynamics for stability because of the lower level of power used in their launches. This lowered level of velocity requires the use of a rail or rod to give the rocket greater stability and ensure straight upward launch. Launch should occur in open space for safety.
A rocket’s thrust from the engine will propel it into the air until the fuel is completely burned and it enters a coasting flight pattern. The period of ascent while fuel burns is called “Powered Ascent.” Then it enters “Coasting Flight,” this is still an ascent but is weakened in speed with no further thrust. During the coasting period, a “delay charge” burns in the engine waiting for the ejection charge to release.
The “Ejection Charge” phase begins the descent by creating high enough levels of pressure to release the nosecone and release the parachute or recovery method. Ideally, the rocket will go straight up and down, but the wind can often carry it as it loses speed transitioning from ascent to descent.
After the parachute is deployed, it will slowly descend to the ground and can be used again once the engine is replaced. The parachute prevents damage to the rocket for continued use.
Model Rocket Engines
Without an engine, there is no model rocket launch. Knowing all about the engine of your rocket will dictate the flying altitude and the power it possesses. This is also important information to know for safe and easy flying.
Sizes and Classification
Model rocket engines vary in size, dictating their power and therefore flight abilities. With a fairly straightforward classification system of letters and numbers, you will know exactly what type of power you are dealing with for your rocket.
When seeing model rocket engine options, they will typically follow this format:
LETTER NUMBER – NUMBER or for example: C11-3
Letters
The “power” in an engine is known as “total impulse” and it determines the amount of time that it takes for force to make a rocket fire. Total impulse is measured in Newton-seconds, or the standard unit of impulse.
Using the alphabet, the lower sized engines start at “A” and work their way up with increasing levels of power.
The “A” rocket engine has been set at 2.5 Newton-seconds and each ascending letter doubles this number. So, a “B” is 5.0 Newton-seconds, “C” is 10 Newton-seconds, and so on.
Mini engines can be smaller than A and are typically designated with a fraction before the “A.” The 1/8A engine has an eighth of the total impulse of the standard A and 1/2A has half the impulse of an A. 1/8A is considered a micro engine and both 1/4A and 1/2A are low power engines.
Numbers
The first number after the letter describes the thrust produced by the engine (in Newtons). Thrust is what is used to move the rocket through the air. This measure of thrust shows how quickly a motor can deliver its totally energy.
Different rockets require different levels of thrust for successful flight. Too much thrust on a smaller rocket may destroy it, and not enough may not allow the rocket to take off. Lower thrust produces more drag, which may slow down the engine too much if it is not powerful enough.
A higher number means more thrust in a shorter period of time. While you may have a “C” power engine, it may not be using its full potential with a lower thrust level. You can control power by limited the thrust.
The final number after the dash tells the time between propellant burnout and the ejection charge being fired (in seconds). When the motor fully burns, the rocket is still moving very quickly. The time delay represented by this value gives the rocket time to coast and slow down before the recovery system is ejected. Longer delays are better for lighter rockets as they tend to coast for longer periods of time. You do not want the rocket to fall during the delay period.
A higher number represents a longer delay time for the ejection.
Example
Lots of numbers and letters can get confusing, especially when we see them one after another. Here’s a quick explanation of the “C11-3” example we used above.
Letter: C (This is a C-class motor, giving 10 Newton-seconds of total impulse)
First Number: 11 (This rocket produces 11 Newtons of thrust)
Second Number: 3 (There is a 3 second delay between the propellant burnout and the ejection charge firing to initiate the recovery system)
Be sure to use the suggested engine size noted in the rocket instructions. This will ensure successful flight while others may not be compatible or too powerful for the designated rocket. Too powerful of rockets can be lost from sight in the sky and more difficult to retrieve.
Certification
For lower to mid-level rocket engines, anyone can use and purchase them. As you work your way toward high power rockets, certification is required for purchase and use.
| Engine Size | Power Level | Certification Required? |
| A-D | Low Power | No, anyone can purchase and use |
| E-G | Mid power | Anyone can get E, some F and G require certification |
| H-O | High Power | All require certification for purchase and use |
Certification is set in place to ensure safe use of rockets. Only those who are knowledgeable in model rocketry, rocket engines, and safety procedures are permitted to use rocket engines that require certification. Lots of paperwork and documents are needed in applying for certification. This must be showed as proof when purchasing.
Certification Levels:
- Level 1 Certification: Some F and G engines as well as all H and I engines
- Level 2 Certification: J, K, L engines
- Level 3 Certification: M, N, O engines
One must obtain “Level 1 Certification” before they can move onto higher levels. High level rockets must have their design and construction reviewed by rocketry governing bodies before launch to ensure safety and accuracy.
Quick Calculations
If you want to determine some values related to your engine, here are some quick equations and shortcuts:
- Thrust (in pounds): # of Newtons / 4.45
- Average burn time of engine: Total impulse / average thrust
These values should be found on the packaging of your engine. Values may differ slightly between personal calculations and the given information as manufacturers sometimes round these values for simplicity.
The Right Power for You
Your experience level has a direct impact on the type of engine you should be using in your rocket. The solid engines used in model rockets today are much safer than those used in the early days of the hobby. People used to put themselves in danger by mixing fuels. Now, everything is done for you and you can eliminate the danger of early combustion without taking away the fun.
For beginners, it is suggested that engines be kept under “C” level. This will prevent you from losing the rocket to too high of altitude.
Using too powerful of engines with little experience can be dangerous as the rocket you build may not be able to handle the thrust forced upon it. Too much power may damage the rocket if it is not well-equipped.
For any model rocket user, no changes or modifications should be made to the engine. Any source of heat can ignite the engine and may cause serious injury. All engines used in model rockets must be commercially manufactured according the National Association of Rocketry (NAR) Safety Code.
Recovery System
The recovery system is a crucial step in the model rocket flying process because it makes it possible for you to fly your rocket again. If there were no recovery system, the rocket would drop down to the ground at a high speed with a sharp nosecone to lead it. This could cause damage or injury to people and nearby objects – especially if the wind takes your rocket out of sight or it leaves the launch area.
How It Works
After the rocket has been launched, the engine will burn until it reaches maximum altitude. This then triggers the ejection charge, delaying the recovery system from releasing until all fuel is burned. Once the ejection charge releases, the parachute or other method of recovery will activate.
This occurs as the rockets coasts, reducing in speed and preparing to descend. The parachute will release from the body tube and slow down the rocket, taking away its ability to drop sharply.
As it nears the ground slowly, it may blow slightly in the wind, but the lack of speed should keep it within your launch range. This slow descent allows you to grab your damage-free rocket and launch it again.
Types of Recovery Methods
The most common recovery systems are parachutes and streamers. These are typically found in most entry level model rockets. These systems can vary depending on the type of rocket you are using and personal preference.
- Parachute / Streamer: The most common recovery system and very common in small model rockets. They can be used with larger rockets if the parachute size is much bigger than the rocket. Rocket deploys recovery system from inside and fire-proof material is put in between the motor and rocket to prevent recovery system from damage. For more reading see our article on parachutes vs. steamers: when to use and avoid each.
- Featherweight: Simplest recovery for very small rockets as it lets the rocket float to the ground after the motor has been ejected.
- Tumble: Another simple rocket recovery method, the rocket tumbles back to the ground. You want to use this on rockets that will not have a stable, straight flight back to earth for safety. Can put engine to the rear of the rocket to make it unstable and land unbalanced.
- Nose-blow: Simple technique where the nosecone is released and takes away any aerodynamics, slows it down, and usually only works in lightweight rockets.
- Glide: Wing deploys from motor and will enter a spiral glide to return safely to the ground.
- Helicopter: Helicopter-style blades are used for the rocket to rotate slowly back to the ground.
Getting into Model Rockets
Model rocketry as a hobby has little barriers to entry and is valuable for all age groups. People enjoy the hobby for the ability to work with their hands, be creative, enjoy a finished project, get a thrill from launching them, and to learn something new. There is lots of value one can gain from getting involved in the hobby.
Why Should You Try Model Rockets?
- It is inexpensive: Most model kits will cost under $20, being affordable considering they are reusable. The separate purchases of engines and wadding are only a couple of dollars. One-use engines typically cost $2-3 per unit.
- It’s fun: Both small children and adults enjoy seeing a rocket blast off over 1,000 feet into the air. It is even better when you were the one to build it and see these exciting results.
- Educational: Many children are introduced to science concepts for the first time through model rockets. Many scientists attribute their career interests to this hobby in their childhood.
Best Model Rockets for Beginners
The best model rockets for beginners fall into specific categories based on skill. Skill levels range from 1-4 and increase with the difficulty of both the build and the launch. Beginners should use Ready to Fly (RTF), Easy to Assemble (E2X), and Skill Level 1 rockets. Skill Level 1 rockets are the most difficult of the three as they require more assembly, but are well-suited for those with little to no experience.
Children may benefit from the RTF and E2X as they require less assembly but still garner an interest in rockets. The limited assembly requires less manipulation and precision in construction. This is also a great option for those less interested in building and more interested in flying!
Estes in the market leader in model rockets and offers great rockets for all skill levels. They have an expansive selection of rockets for beginners as well.
Our favorite Estes beginner offerings:
Estes Alpha (1225)
This is one of the most popular Estes beginner rockets and has been on the market for a long time. It has a simple design, easy to follow instructions, and allows you to learn the craft of building model rockets. If you plan to progress to larger and more complicated rockets, the Alpha (link to read reviews on Amazon) is a great beginner kit. With more pieces to assemble than other models, it prepares one for even more assembly at higher levels.
Tandem-X Flying Model Rocket Launch Set
This set includes not one, but two rockets plus materials needed for launching. This is a great set for beginners who hope to progress onto larger rockets. The Tandem-X (link to read reviews on Amazon) includes an E2X and Skill Level 1 rocket as well as a launch pad and launch controller. You will not need to purchase the launch materials again and will have built up a nice rocket collection from the start. This set has great economic value compared to buying the items individually!
Model rockets require separate purchase of engines and wadding for each use.
For more reading and suggestions check out Best Model Rockets for Beginners.
Go Fly!
Model rockets intrigue people for their power and speed. They are able to blast through the air, providing us with excitement and thrills. This is one of the least expensive and most educational ways to achieve that rush. Building a rocket with your own hands and seeing it blast into the air is a step up from typical building and crafting projects.
Try one of the rockets we recommended and work your way up to more powerful and complicated designs. Mastering skills and working your way up to higher levels can be incredibly rewarding. With great attention to safety and details in building, you’ll be able to see your finished project make its way from the box and into the sky!
Build Your Own Launch Controller
Don’t forget! You can ditch the stock controllers and confidently build your own from scratch using our step-by-step instructions and exact materials list! We promise this will make your launch experience 10x better, and using our course License to Launch you can be 100% confident you’ll be able to finish this project and be super proud of what you’ve built! Here’s a sneak peek below.