Build Your Own Launch Controller

Recent Posts

Are Model Rockets Reusable? Each Component Assessed


We buy and assemble model rockets to launch them time and again, but is each component of the rocket itself built for this? Are model rockets reusable?

Most model rocket components are reusable including the body, parachute, launch stand, and controller. The engines, igniters, igniter plugs, and recovery wadding are usually only made for one use, however high-powered rockets often use larger reloadable engines to reduce the cost of each launch.

Here, we are going to take a look at the various components of model rockets and cover whether or not they are meant to be used repeatedly or only once. We’ll also cover some signs that the reusable parts of your rocket are ready for repair or replacement.

Are Model Rockets Reusable?

With beginner rockets (think Estes brands and the like), most of the components are reusable.

One of the perks of the hobby is that you can get quite a lot of use out of one rocket! We’ll cover some of the main components associated with the rocket and discuss their reusability. 

Model Rocket Body

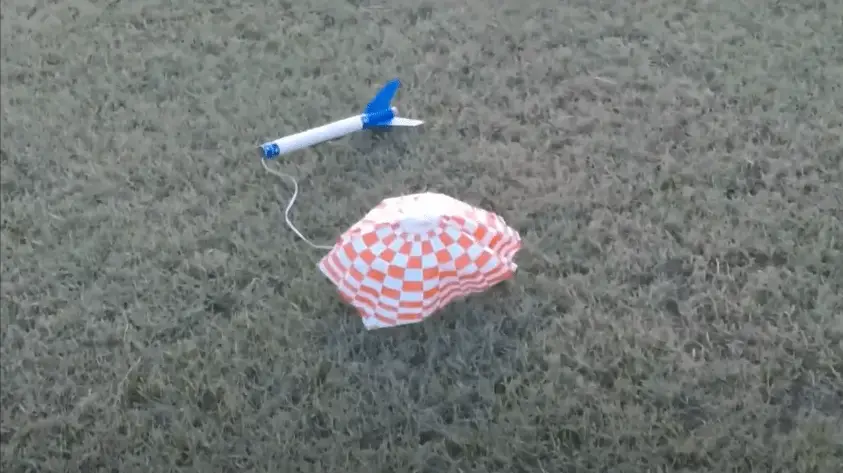
The actual fuselage of the rocket (body/tube, fins, nose cone) are reusable pending any damage (discussed below).

Even the small ones are fairly durable and can withstand many launches and landings!

Parachute

The rocket’s parachute is reusable, though small tears will require repair or outright replacement.

If you are using streamers as a recovery mechanism, these are reusable as well. Here’s more information on why you would use parachutes vs. streamers.

Wadding

If you are able to locate the wadding after the launch, it is technically reusable though it is recommended to use fresh wadding for each launch.

Model rocket recovery wadding is what separates the engine from the parachute.

When the engine fires the ejection charge upwards through the rocket to deploy the parachute, the recovery wadding is what keeps the parachute from catching fire. If you’re curious, here are common recovery wadding alternatives.
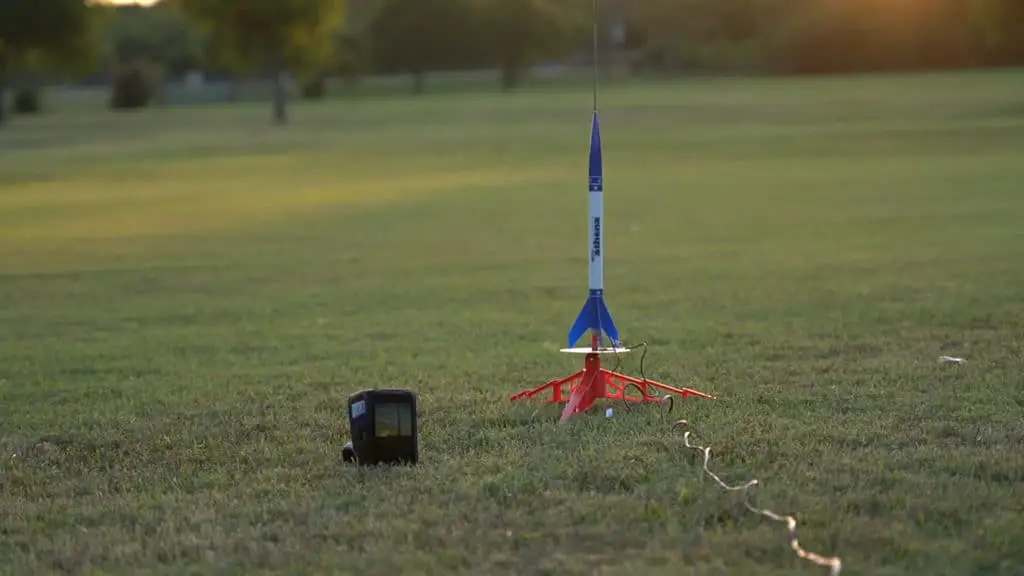
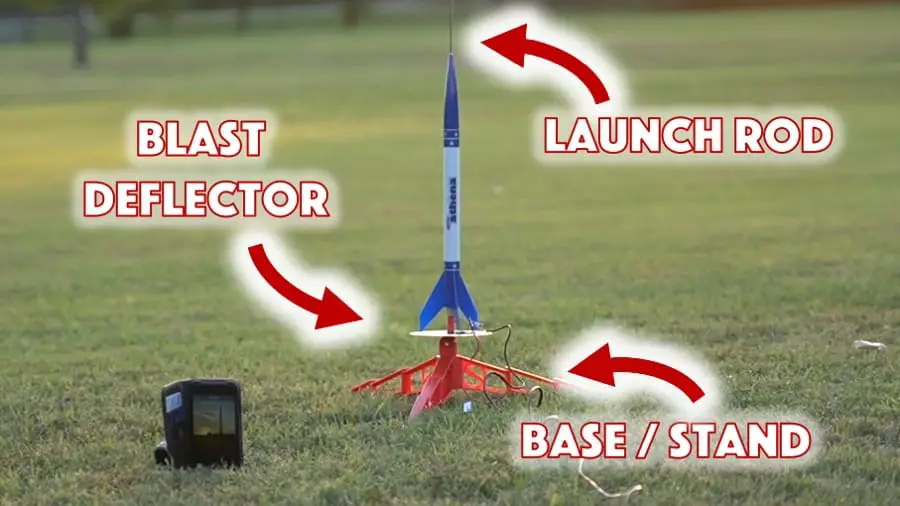
Launch Stand

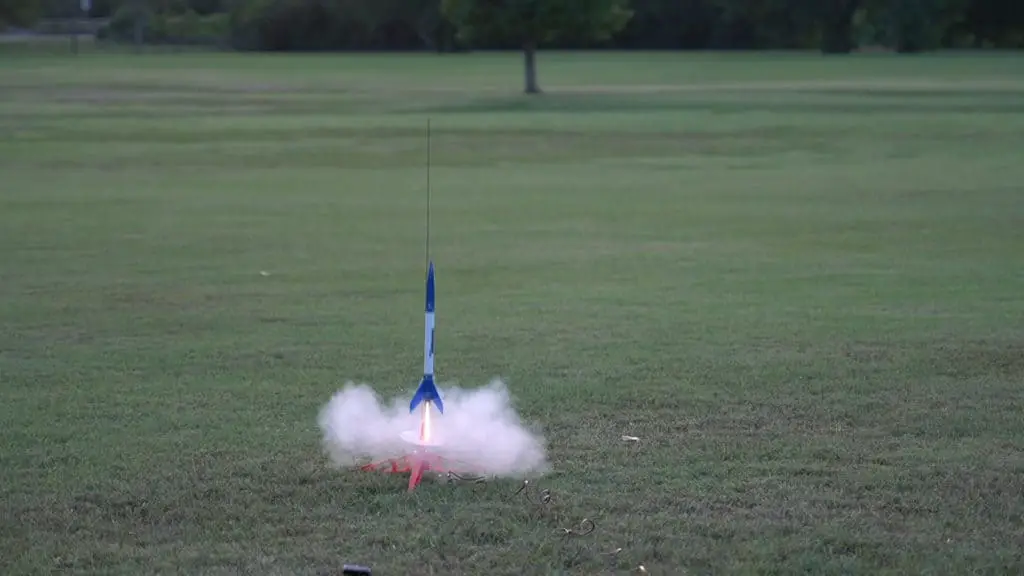
The launch platform for the rocket is also reusable.

The launch pad both serves as a guide for the initial trajectory of the rocket, as well as a shield from the flames of the engine ignition before the rocket leaves the ground. The launch stand will definitely last a while, though there are a few things to look out for to maintain its integrity, and these are discussed below.

For more reading on launch stands, see our guide to model rocket launch pads.
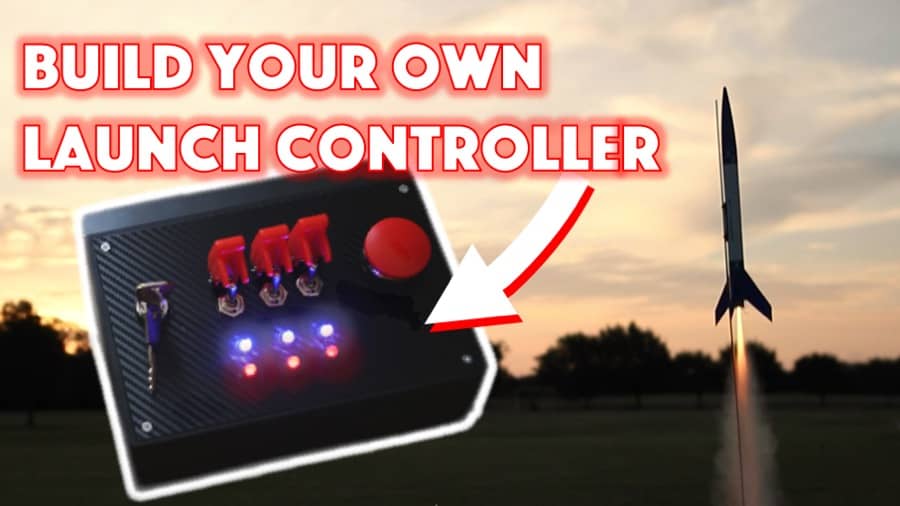
Controller

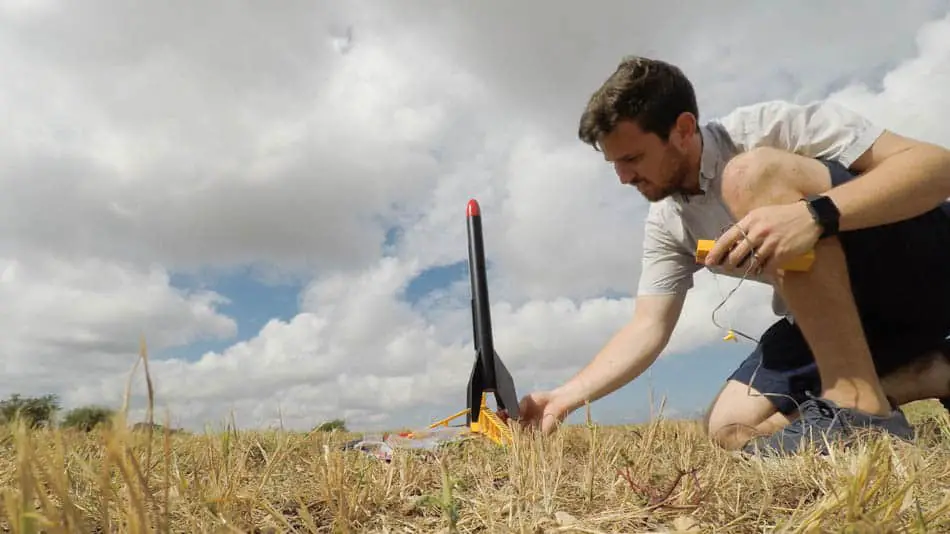
The model rocket launch controller is definitely reusable.

While most rocketeers start out with a typical Estes launch controller, one very exciting way to radically change the launch experience is to actually build your own controller.

That is what we did, and we realized that it can be daunting and confusing to figure out how to do it from scratch. So, we documented every step of the process and how we were able to assemble two awesome controllers, and put it into a video course called License to Launch.

The video is below and you can check out the contents of the course here. We promise it will make your launches 10x more fun! It definitely did for us. 

Engine Igniters and Plugs

Engine igniters and the plugs that keep them in the engine pre-launch are unfortunately not re-usable. They burn up while lighting the engine and cannot be used again.

Fortunately, when you purchase packs of engines they come with new igniters and safety plugs so the cost is already included in the engine purchase.

Engines

Low-powered rocket engines are for the most part not reusable. The common engines that you would put into an Estes rocket and buy at the hobby store are made for one use only.

However, there are instances of reusable rocket motors where the motor housing is reusable and just needs to be reloaded with propellant.

Reusable motors are more common in high-powered rocketry as the larger motors are more expensive, particularly if you’re only using them once.

HobbyLinc provides some resources to assemble these reusable motors, but you can also find out more by contacting your local NAR (National Association of Rocketry) chapter as they will have members proficient in this area.

For more information on rocket engines, see our model rocket engine classifications guide.

When to replace model rocket components?

While many components of model rockets are meant to be used over and over, they won’t always have an indefinite useful life.

There isn’t a hard and fast rule on how many launches the body or the parachute or the launch stand will be able to withstand, so you will need to keep an eye out for when to possibly replace these components.

In general, you want to repair or replace any of these components whenever they have a near chance of failure which would impact the safety of a launch.

Here are some things to look out for:

Model Rocket Body

The rocket fuselage is usually pretty durable, but you’ll want to keep an eye on the nose cone and the fins and make sure they remain intact.

If a fin is loose, chipped, or missing, the rocket could have altered flight characteristics that make it dangerous. Keep an eye for any large dents or cracks in the nose cone.

Even if they aren’t damaged in a landing, they are easy to accidentally step on at the launch site or in your home and damage.

While most of them are made of plastic and are pretty resilient, personally I would not fly a rocket if any part of the body (nose cone, fuselage, or fins) had been compromised. They are inexpensive to replace and are not worth the chance of a risky flight if they have been damaged.

Parachute

The most common parachute failure is where the strings attach to the parachute. Often times these holes can tear, which can lead to a partial chute opening or complete failure.

Make sure to inspect these before each launch and carry some extra hole reinforcement stickers (link to Amazon for options) with you for quick repairs.

If the parachute itself gets torn I would also replace this prior to any launch as it can jeopardize the decent rate of the rocket or the fullness of the chute opening and possibly damage the rocket during landing.

Wadding

Personally, I would replace this after each launch, but if you are able to locate the used recovery wadding it can possibly be re-used if it’s still intact and not burned or worn. Do so at your own risk.

I would replace this for each launch to ensure the rocket and its parachute is adequately protected against any fire hazard of the parachute deployment.

Launch Stand

The first part to wear out will be the blast deflector. Eventually you can have holes in the blast plate, which at that point I would replace it.

Also ensure that you launch rod is not bent in any way. It is easy to accidentally bend these by stepping on them, and they’re inexpensive to replace. You want to ensure the rocket has a very smooth launch off of the pad.

Controller

Most commonly you’ll just need to replace the batteries on controllers and not the controller itself unless you are wanting to build your own.

We mentioned it above but we’ll say it again, we highly recommend our License to Launch course to build your own controller – we promise it will make your launches so much more fun!

In Conclusion

For the most part, model rockets are made to be used over and over again. While the engines will need to be replaced or re-loaded for each flight, most of the other components of the rocket and meant to be reused. This keeps the expense of the hobby relatively low as one rocket can last you a very long time!

Keep an eye out for your other model rocket components to see when they are beginning to wear or possibly fail, as you’ll want to repair and or replace those over time to maintain the safety of each launch.

Model Rocket Launch Pad Guide


Any time you see a model rocket launch, you’ll usually see a launch pad, and any serious model rocket enthusiast wouldn’t dream of launching without one. 

So, what is the use of a launch pad for model rockets?

Model rocket launch pads hold the rocket prior to launch and stabilize it during launch. The launch pad consists of a launch rod that aims and stabilizes the rocket’s initial trajectory, and a blast deflector plate that protects the ground and launch pad itself from the flames of the engine.

Launch pads for model rockets can be either purchased as part of a model rocket kit or made by hand. Read on to find out more about the functions of a model rocket launch pad and why you need one for your launch. 


Are you still using the standard Estes controllers for your launches?

We just built our own beautiful launch controllers that make launches SO much more fun, and we documented EVERY single step and item purchased and put it into a step-by-step course that teaches you how to do the exact same thing.

Click here to learn more about how you can build your own launch controllers!

Get the EXACT materials list along with easy to follow step-by-step instructions on how to build your very own launch controller and make launches 10x BETTER in our course: License to Launch

Components of a Launch Pad for Model Rockets

The launch pad for a model rocket consists of two primary components:

  • The launch rod: This is the piece of the launch pad sticking straight up in the center that the rocket attaches to and can be angled or adjusted to compensate for prevailing wind direction that could otherwise throw the model rocket off course.
  • The blast deflector plate: The blast deflector plate is the (usually) metal flat part of the launch pad that lies parallel to the ground; both the model rocket and the launch rod are located on the top of the blast deflector plate. It protects the ground and launch pad itself from the flames of the engine.

Launch Rods

The launch rod is the vertical tower structure in the center of the launch pad that the model rocket attaches to, usually through connection via a launch lug. A launch lug is a small hollow tube attached to the outside of the rocket that the launch rod can slide through.  

The launch rod is responsible for the following functions:

  • Adjusts the trajectory of the rocket to compensate for wind direction/velocity 
  • Holds the model rocket straight up and down so that it doesn’t fall over and launch horizontally by accident
  • Helps guide the rocket until it achieves a speed at which it can be effectively stabilized by the rocket’s fins (for more information check out our Model Rocket Fin Guide)

Launch rods are most suitable for launching lower-powered model rockets but are considered too flexible to launch medium or high-powered rockets with a heavier weight range. 

Blast Deflector Plates

The blast deflector plate (link to picture on Amazon) is the flat base that the launch rod locks into, and the rocket sits on top of. The blast deflector plate is responsible for the following functions:

  • Gives the model rocket a steady base to launch from, decreasing the possibility of a tip-over or horizontal launch
  • Helps prevent grass fires caused by the blast of the model rocket engine
  • Adjust angle of the launch in support of the launch rod

Blast deflector plates are necessary for launching any model rocket regardless of size or power.

The engine combustion involved in launching model rockets always has the possibility of causing a grass fire, and blast deflector plates help prevent that. 

Different blast deflector plates are often designed to accommodate a few different launch rod diameters. That means that even if you plan to launch a variety of rocket sizes, one blast deflector plate will likely work for most of them. Here’s a common blast deflector plate found on Estes launch pads (link to Amazon).

Launch Pads are Vital for Model Rocket Fire Safety

While model rockets are a fun and rewarding hobby, they still involve the use of fire, and fire can be an unpredictable and hazardous natural force. 

The reason a blast deflector plate (as part of a launch pad setup) is so important in the launching of model rockets is that it is key to fire prevention. 

Launch pads help prevent fires in the following ways: 

  • Wind compensation: The launch rod and blast deflector plate help the rocketeer adjust for high winds, which can ensure that the model rocket is recoverable because it will land where the rocketeer anticipates it will land.
  • Fire prevention at launch point: The blast deflector plate helps protect the ground directly beneath the launch point of the rocket from being scorched and catching fire from the power of the rocket’s motors. 

Along with setting up an appropriate launch pad, rocketeers should also undertake the following operations during launch to help enhance fire prevention and safety:

  • Keep an extinguisher on hand: Make sure that any time you launch a rocket, you have a handheld fire extinguisher at the ready to combat any grass fires that may catch as a result of the launch.
  • Recover your rocket: Reduce the possibility of a smoldering rocket starting a wildfire by recovering your rocket post-launch. You can now attach a GPS tracker to your rocket (link to our recommendation on Amazon) or a beeper/siren in order to find it more easily after it launches.  

When launching model rockets, the threat of fire or fire-related injuries is by far the largest danger faced while engaging in rocketry. It pays to make sure you’re prepared to prevent one, just in case. 

Where Can You Buy a Launch Pad for Model Rockets?

If you don’t want to make a launch pad for your model rockets, there are many different brands of model rocket kits and launch pads available online.

One of the most common launch pad sets is made by Estes and is available here for purchase (link to read reviews on Amazon). Others are also available through Apogee and other vendors.

Many Estes bundles also come with the rocket and the launch stand and controller all in one package, such as the Estes Taser Rocket Launch Set (link to read reviews on Amazon). Bundles like these can be a fantastic entry point for new rocketeers.

How to Make a Model Rocket Launch Pad

If you don’t want to purchase a premade model rocket launch pad, you can always make one by hand. There are many free plans available on the Internet to create makeshift model rocket launch pads out of commonplace materials such as PVC pipe. Here is an example of a free launch pad design and instructions.

These plans feature a variety of different materials, tools, and household items, including the following: 

  • Ceramic tiles
  • PVC pipes
  • Nuts, bolts, screws, and washers
  • Wood
  • Adhesives
  • High-powered drills 

Before attempting to construction your own launch pad, you should take into consideration the dimensions of the different model rockets you intend to launch, as well as the durability of the materials you’re attempting to use. 

Many materials on a launch pad may be exposed to momentary high temperatures (or sustained high temperatures if a rocket gets caught on the launch pad), so they have to be sturdy and fairly flame retardant.

Model Rocket Launch Pad Construction Materials

There is some debate as to what materials are most suitable for the creation of a commercial model rocket launch pad. Some manufacturers use stainless or galvanized steel, while others use plain solid steel. 

While stainless steel might look good, it really doesn’t offer any benefits over solid steel when it comes to launch pad construction, and the rusty patina that develops on solid steel does not impact the ability of the blast deflector plate to perform its function. 

The advantage of choosing a solid steel blast deflector plate versus a stainless steel or galvanized blast deflector plate is that the solid steel versions are typically cheaper, which can leave the rocketeer a larger budget for purchasing the model rockets themselves. 

Enjoy Your Launch 10x More With Your Own Controller

While we’re on the topic of the equipment needed for launching rockets, have you checked out License to Launch? It’s our step-by-step video course that shows you exactly how to build your own custom launch controller to make your launches SO much more exciting!

We spent hundreds of hours and dollars testing different components to boil it down to an exact list of materials you’d need and the exact steps you’d need to take to build it from scratch, and it’s all available in our course License to Launch.

Click here for more information on how to purchase and see what’s inside!

The Essential Guide to Model Rocket Nose Cones


When it comes to model rocket nose cones, nose cone design is almost a discipline in rocketry all its own. The shape and construction of a nose cone impact the aerodynamics of the overall rocket, and subsequently, whether it’ll fly or not. 

So what do you need to know about model rocket nose cones?

Model rocket nose cones vary in shape, which each have unique properties of drag that affect the overall aerodynamics and efficiency of the model rocket itself. Compared to other designs, elliptical and parabolic nose cones tend to be the most efficient due to their reduced drag.

This guide will summarize the following: 

  • How rocket nose cones factor into aerodynamics
  • How rocket nose cones affect the flight of a rocket
  • Types of model rocket nose cones
  • Materials commonly used for model rocket nose cone construction
  • How to measure model rocket nose cones

Whether you’re constructing a prefabricated model rocket or designing a handcrafted one of your very own, understanding the aerodynamic design of nose comes is crucial to understanding the overall science of rocketry and how a rocket gets off the ground. 


Are you still using the standard Estes controllers for your launches?

We just built our own beautiful launch controllers that make launches SO much more fun, and we documented EVERY single step and item purchased and put it into a step-by-step course that teaches you how to do the exact same thing.

Click here to learn more about how you can build your own launch controllers!

Get the EXACT materials list along with easy to follow step-by-step instructions on how to build your very own launch controller and make launches 10x BETTER in our course: License to Launch

Model Rocket Noses and Aerodynamics

Aerodynamics is (according to NASA) the science of how air moves around objects and is also the science of how physical objects are able to fly. The science of aerodynamics affects natural occurrences such as bird flight, but it is of supreme interest to scientists when it comes to aerospace engineering. 

Aerodynamics consists of the four physical forces that are exerted on an object when it is flying through the air: lift, thrust, drag, and weight (gravity). 

The aspect of aerodynamics most heavily influenced by the nose cone of a model rocket is drag, also known as air resistance. The more drag an object has, the more thrust it requires to lift it.

How do Model Rocket Noses Affect the Flight of a Rocket?

As discussed in the previous section, model rocket nose cones affect the drag on a rocket, but how does that affect its flight? This comes back to the aerodynamic force of drag, which is in opposition to the aerodynamic force of thrust provided by the rocket’s motor.

The smaller the diameter of a rocket’s nose cone, the faster the rocket can be launched in proportion to the amount of thrust provided.

This means that rockets with pointed nose cones are capable of moving very quickly. This is the same design shared by airplanes designed to go supersonic, such as the Lockheed Martin SR-71 Blackbird stealth plane.

In contrast, commercialized aircraft are usually designed with a parabola or elliptical nose cone design due to decreased drag and increased efficiency.

For the highest possible altitude, a rounded, parabolic shape is best when designing a model rocket nose cone. However, there are many different kinds of model rocket nose cone shapes that have been used throughout the history of the hobby. 

Types of Model Rocket Nose Cones

There are many different kinds of model rocket nose cones with various levels of aerodynamic effectiveness. Here are some of the types of model rocket cones: 

  • Conic nose shape: Conic nose shapes are rocket noses that come to a point. These rocket noses call back to the first days of modern rocketry, and are often found in model rocket replicas of old rockets such as the Saturn V. This rocket nose design is easy to construct, but not very aerodynamic in comparison to more rounded designs.
  • Spherically blunted conic nose shape: This rocket nose shape is a cone shape in basic design but features a spherical endpoint.
  • Bi-conic nose shape: Bi-conic nose shapes feature a two-cone design with a secondary cone stacked at the frustum of the first cone shape. This results in a staggered but planed tapering effect.
  • Tangent ogive: Other than classic conical nose cones, tangent ogive nose cones are one of the most easily recognized designs in model rocketry. This is also a popular design shape for the construction of bullets.
  • Elliptical: Elliptical nose cone designs feature a blunt nose and a tangent base, making them popular in low-powered model rocketry because they are very aerodynamic at relatively low speeds (subsonic flight).
  • Parabolic: Parabolic nose cone designs are a rounded nose cone design like elliptical nose cones, but aren’t necessarily at a flat angle at the point the nose cone meets the rocket body tube. Parabolic and elliptical shaped nose cones have been adopted in many commercial aircraft due to the reduced drag and corresponding reduced fuel consumption.

There are a few advantages and disadvantages regarding conical rocket nose shapes vs. rounded nose shapes. Here is an overview of the basic differences between the two: 

  • Conical (and to a lesser degree ogive) cone designs are more effective at trans-sonic and supersonic speeds.
  • Elliptical and parabolic cone designs are more effective at subsonic speeds (which is the speed almost all model rockets operate under).
  • In general, accurate elliptical and parabolic nose cone designs are more difficult to accurately construct than conical designs. 

Materials Used in Model Rocket Nose Cones

Model Rocket Nose Cones can be constructed from a wide variety of materials, and these materials have a range of effects on the overall weight and aerodynamics of the rocket.

Common materials used to build model rocket nose cones include the following: 

  • Plastic: Prefabricated plastic model rockets (like those listed in our guide for best beginner model rockets) are most commonly constructed from high impact polystyrene (HIPS) or polyethylene. These plastics have the benefit of being both durable as well as lightweight.
  • Balsa wood: Balsa wood is a suitable wood for many kinds of craft and artisan applications since it is one of the world’s lightest woods. Many prefabricated components of model rockets are created out of balsa wood, such as model rocket fins.
  • Hardwood: Hardwood is sometimes used in the construction of handmade rockets, but is not as commonly used due to its high weight to volume ratio. However, it is one of the easier model rocket materials to source and is relatively inexpensive.
  • Fiberglass: Fiberglass is a common component in prefabricated model rockets, and is prized for being chemically inert, malleable, and stronger than many metals under load while remaining lightweight.
  • Styrofoam: Rigid Styrofoam sheets are a good choice for model rocket construction because they are light, stiff in construction, and relatively easy to shape. Styrofoam also has the benefit of being flame retardant.
  • Cardstock or paper: While paper and cardstock nose cones aren’t as sturdy as some of the other materials in this list, these materials are easily found around the house and
    are inexpensive, which makes them a good choice for casual rocketry and experimental
    design work. 

Some of these materials, such as hardwood and balsa wood, are easier for those rocketeers who are having to construct their model rocket nose cones from a garage or workshop.

However, with the advent of 3D printing in model rocket design, lightweight plastics are quickly becoming a popular choice for constructing more smooth and accurate nose cones. 

Several factors determine the materials used for model rocket construction.

Wood, paper, and certain plastics are more often found in handcrafted model rockets, while plastic and fiberglass are popular construction materials in model rocket replicas of full-scale rockets. 

Model rocket nose cones can be either designed to be solid or hollow. Hollow nose cones weigh less and as a result, create less oppositional force to thrust, so this is a design factor often included to decrease overall rocket weight. 

What you decide to build your model rocket nose out of will be largely determined by what kind of resources you have to build with. If you have a 3D-printing station or a wood shop, you’re going to have much different options than someone who doesn’t have easy access to
those tools. 

Building Your Own Model Rocket Nose Cone

If you’re building your own model rocket nose cone from scratch, you’ll need to consider the time and energy investment required to design your own versus having a model rocket delivered to your door.

While there is something to be said for having created your own model rocket from the ground up, designing a rocket piece by piece is intricate science. 

Luckily, there are some ways to test the design of a nose cone to determine how effective it will be, both prior to construction and during/after launch.

It can pay to do a little bit of this theoretical legwork up front before you start construction so that you can resolve any design flaws before the rocket is built out. 

Before you ever start building your rocket, one way to determine the most aerodynamic nose cone design is to design your rocket in a simulator.

There are several programs available that allow you to see exactly how your rocket would perform in a flight simulation. Here are some of the programs you can use to test the aerodynamic qualities of your nose cone design:

  • SpaceCAD: SpaceCAD allows you to do a fully integrated flight analysis and simulation of your launch, including factors like recovery parachutes. For rocketeers who are serious about learning how to design their own model rocket nose cones from the ground up, SpaceCAD is essential.

  • OpenRocket: OpenRocket is a freeware model rocket simulation software, so for rocketeers who are just getting started in the hobby and are tight on funds, this is a good choice for enhancing your rocket design process for more accurate and impressive results at launch.

  • RockSim: RockSim is the model rocket flight simulator software of Apogee Rockets, arguably one of the largest model rocket manufacturers on the market. This is a good choice for anyone who is wanting to mix and match various prefabricated Apogee model rocket components
    as well. 

Model Rocket Nose Cone Performance Evaluation

The best way to find a nose cone design that will be right for your launch is to experiment with several different nose cone designs before committing to one for construction.

After you’ve constructed your nose cone, however, you can actually test the aerodynamics of your nose cone design by using sensors such as accelerometers and altimeters. 

  • Accelerometers: Accelerometers are sensors that can provide data from the flight such as speed, acceleration, g-forces, and more.
  • Altimeters: Altimeters are sensors that measure the altitude of the flight.

Here’s our starter guide to model rocket accelerometers and altimers.

If you’ve already designed and built a model rocket, installing an accelerometer and an altimeter as the model rocket’s payload can allow you to capture flight data during the launch that will give you some serious insights into how to increase your flight performance for the next run, and can also tell you objectively which nose cone shape leads to a higher or faster launch. 

Not only that, accelerometers and altimeters can also tell you about the other design variables impacting your rocket’s flight pattern, such as the fins or body contours.

If you are serious about improving your model rocket designs, these sensors can give you the information you need to know to push your designs to the next level. 

By recording your flight data whenever you launch one of your constructed rockets, you can measure statistics such as maximum speed and maximum altitude as well as create an overall acceleration profile. 

Once you have this data in hand, you’ll have a much stronger visual concept of how well your rocket is actually performing in flight versus a simulation. 

How to Choose Accelerometers and Altimeters to Evaluate Nose Cone Performance

When choosing accelerometers and altimeters to enhance your rocket flights, keep the following things in mind before installation:

  • Payload size and location: When adding a payload to a model rocket (here are our 16 payload ideas for model rockets), you need to account for the change in weight and overall balance. Adding things to the rocket’s design can seriously alter the way that it reacts on an aerodynamic level. Rockets that are going to be flown competitively will also want to maintain the lightest overall weight possible to remain competitive.
  • Power source: Accelerometers and altimeters come battery-powered, but some of them can be recharged via a USB port.
  • Data recovery: Accelerometers and altimeters recover launch data in different ways depending on the model of sensor.

    Many of these sensors are linked into a computer “mission control” prior to launch and sync the data wirelessly to the computer during launch using a Bluetooth connection. Some of these sensors transfer data directly to your smartphone rather than a computer. 

These sensors will not only allow you to measure which nose cone shape is more aerodynamically effective, they will also allow you to measure how effective various construction materials and other design aspects are as well, and what impact they have on flight performance of the model rocket.

Competitive Model Rocket Design 

The reason nose cone design is so important is because it affects two different aspects of flight that are measured during model rocket flight competitions: flight duration (how long the rocket remains airborne) and altitude (how high it goes before it begins its descent). 

When constructed with a nose cone design that is less aerodynamic than its competitors at the basic mathematical level, a model rocket is destined to not fly as high as its sleeker rivals. This is why understanding the concepts behind rocket design are just as important as the construction of the rockets. 

Those rocketeers who design model rockets as a leisurely hobby can afford to be radical in their experimentations with regards to how they build their rockets. However, those who want a serious competitive edge need to be a bit more meticulous in their choice of both nose cone design and material construction. 

Model Rocket Nose Cones Are a Vital Aspect of Model Rocket Design

Designing and constructing your own model rocket from the ground up is one of the most satisfying things you can do in the model rocket hobby. For a successful launch, it’s worth the effort to make sure that your design is perfectly balanced and constructed.

Because of their influence on air resistance and drag, designing an aerodynamic nose cone is one of the most important factors in ensuring that your overall model rocket design is going to have a successful flight.  

Model Rocket Shock Cord (Length, Material, How to Attach)


The shock cord is an extremely important component of your model rocket. While not visible while the rocket is assembled, it plays a key role in the recovery of the flight. So what is a model rocket shock cord and what does it do?

The shock cord connects the model rocket’s body tube and nosecone once the parachute has been deployed. It is typically an elastic material that measures approximately three times the length of the rocket’s body tube and gently withstands the force of ejection and parachute opening.

Using the right length, material, and attachment method will ensure that your shock cord is as effective as possible. Here are some tips to do so!


Are you still using the standard Estes controllers for your launches?

We just built our own beautiful launch controllers that make launches SO much more fun, and we documented EVERY single step and item purchased and put it into a step-by-step course that teaches you how to do the exact same thing.

Click here to learn more about how you can build your own launch controllers!

Get the EXACT materials list along with easy to follow step-by-step instructions on how to build your very own launch controller and make launches 10x BETTER in our course: License to Launch

What is a Model Rocket Shock Cord?

The shock cord is typically an elastic piece of fire-resistant material that connects the nose cone and the body tube of the model rocket.

It keeps the nose cone attached to the rocket when it is separated and after the recovery system of the rocket has been deployed.

In one of our launch videos where we are launching the Estes Athena, you can see the shock cord connecting the body tube of the rocket to the nose cone and parachute of the rocket around the 4:50 mark:

Side note, if you aren’t already subscribed to The Model Rocket YouTube channel, would you consider doing so today? We have a ton of content planned out for the channel and if you subscribe you won’t miss any of it!

The Best Length for Your Model Rocket Shock Cord

The length of your shock cord is highly dependent on the size, weight, and motor of your model rocket.

It is suggested that rockets that weigh less than one pound, use either A, B, and C motors (all of which are typically between 18-24mm, these are known as “low-power” motors – see our article on Model Rocket Engine Sizes and Classifications for a full walkthrough), and have a parachute of 1 foot or less, would do best with a shock cord of approximately 2 feet long.

For larger rockets with up to F or G motors, you’ll not only need to increase the length of the shock cord and the material as well.

A Tip for Determining the Best Shock Cord Length for Your Model Rocket

The consensus on determining the length of the shock cord for your model rocket is that it should be three times as long as the body tube of the rocket itself.

As previously mentioned, the two primary things you need to keep in mind when constructing your shock cord are the two forces it is built to withstand: the force of the components dispersing at ejection, and the force of the opening of the parachute. With larger rockets these two forces also become larger, which necessitate a longer shock cord.

The Best Materials for a Shock Cord

The typical materials used to create a shock cord are elastic, rubber, nylon, and Kevlar. Out of all of these materials though, elastic and Kevlar are by far the best and most commonly used.

Elastic Shock Cords

Elastic is great due to its low price and strong ability to absorb the shock of parachute deployment. The problem with elastic is that over time it can be damaged by the hot gas produced by the ejection charge. You can construct an elastic shock cord from a rubber band alone or as a bungee cord – an elastic cord enveloped by nylon, polypropylene, cotton, etc.

Note that you should always avoid elastic that is coated with synthetic materials, and instead use cotton-coated elastic. This is because the chemicals necessary to create bungee cords with nylon, polypropylene and more, may introduce chemicals into the engine reaction (since the shock cord is positioned on the inside of the rocket above the engine) in the event of a malfunction and cause further damage.

Inappropriate materials on the outside of your elastic shock cord can also increase its vulnerability to UV light, abrasion, water, mold, mildew, and more.

Lastly, even though a larger diameter strengthens your elastic shock cord, it will also make it less flexible and harder to work with. The only real modification you should be making with an elastic shock cord is the length and possibly increasing or decreasing the elongation rating – this determines the stretchiness of your cord.

You don’t have to necessarily construct your own shock cord either as Estes (and other manufacturers) sell them pre-made along with their mounting packs (here is a link to Amazon for Estes’ base kit of shock cords).

Most, if not all, Estes rocket kits will also come with the parachute and shock cord as well. Be sure to look at “what’s included” before purchasing a rocket to ensure you have all of the necessary components. You can see all of our favorite Estes beginner kits at our article: Best Model Rockets for Beginners.

Kevlar Shock Cords

Kevlar, on the other hand, has an advantage in its fireproof nature, however, its disadvantage is that it is not as malleable as elastic. It is also more expensive than elastic, but it’s durability readily makes up for these slight inconveniences.

When used in a shock cord, Kevlar is typically used to anchor the shock cord inside of the rocket and then elastic is used as the actual shock connecting to the nose cone.

Kevlar shock cords are specifically attached to the engine mount, and a thread of elastic is tied to the end of the Kevlar cord and tied to the nosecone. Another big advantage to using Kevlar over solely elastic is in its strength (Kevlar is several times stronger than even steel). More powerful rockets tend to end up using a Kevlar and elastic shock cord system for strength and durability.

For smaller model rockets, it is ideal to use 60lb Kevlar, which measures 0.016in in diameter. One hundred (size 300) to one-hundred-fifty-pound Kevlar is the standard for low power rocketry, and 400lb (0.060in in diameter) should be used only for larger model rockets. (Source: NAR)

How to Attach the Shock Cord

The body of the rocket is attached to the nose cone via the shock cord. To effectively attach your shock cord to the body of your rocket, here is a video that outlines the simple steps:

Here’s our own video going through the assembly of the Estes Alpha III (link to read reviews on Amazon), and at the 5:55 mark we show the installation of the shock cord from start to finish:

Summary of Shock Cord Construction

The shock cord is a fairly simple component on your rocket, but it is an incredibly important part of the recovery system. It is always a good idea to double check the fastening and integrity of the shock cord prior to any launch to ensure it is functioning properly.

Be sure to thoroughly plan your flight ahead of time to ensure that you choose the right length and components for your shock cord so that you can experience the best flight possible.

Model Rocket Fins 101: Purpose, Shape, Size, and Placement


Model rocket fins are one of the most important parts of a rocket’s anatomy and can determine whether the rocket flies correctly at all. While fins vary widely in shape and size depending on the rocket they’re attached to, they are almost always present. 

Model rocket fins at the base of the rocket stabilize and guide a rocket’s flight trajectory by creating a center of pressure that is aft (rearward) of its center of gravity. Fins are built in various designs that optimize stability and drag to create the desired flight characteristics of the rocket.

This introductory guide will go over the different concepts related to model rocket fins, such as:

  • Model rocket fin shape
  • Model rocket fin size
  • Model rocket fin placement
  • Model rocket fin aerodynamics
  • Model rocket fin construction

Whether you make the fins on your model rocket yourself or buy a prefabricated kit, you’ll need to understand the basic concepts of why rocket fins are employed and how they aid in rocket flight. Read on to find out more about model rocket fins and why they’re so important. 


Are you still using the standard Estes controllers for your launches?

We just built our own beautiful launch controllers that make launches SO much more fun, and we documented EVERY single step and item purchased and put it into a step-by-step course that teaches you how to do the exact same thing.

Click here to learn more about how you can build your own launch controllers!

Get the EXACT materials list along with easy to follow step-by-step instructions on how to build your very own launch controller and make launches 10x BETTER in our course: License to Launch

Why Do you Need Fins on a Model Rocket? 

The primary reason for having fins on a model rocket is that they serve to stabilize the rocket while in flight. By using fins, the rocketeer is more able to easily guide the rocket on an intended trajectory. 

Without a stabilizing force, a rocket would begin to tumble in mid-air soon after launch just due to the influence of wind and other aerodynamic factors.

This is a real threat with handmade model rockets since it is difficult to keep their measurements precise. 

Model rockets use fins to make sure that they remain nose-up throughout the launch process and can be consistently launched in a single direction. This allows the rocketeer to project a destination.

How do Model Rocket Fins Work?

Model rocket fins use the force of aerodynamics to keep the model rocket on a steady course.

Without the stabilization provided by fins in the rear of the rocket, the center of pressure would be too close to the front of the rocket in relation to the motor. This would inevitably cause the rocket to spin out. 

Model rocket fins serve to shift the center of pressure further back in the design of the rocket so that the center of gravity is forward of it. This keeps the rocket from pitching forward during flight, which would prevent it from being able to fly straight.

Model Rocket Fin Design: It’s Literally Rocket Science

While most people can buy a model rocket kit off the shelf, put it together, and achieve a successful launch, those who design their own model rockets from scratch often undergo a more arduous process to get to that point. 

The reason is that building a rocket means having to know some basic concepts with regards to both aerodynamics and physics, and especially how they pertain to vertical flight. 

For those who are launching model rockets, a good place to start is to know a little bit about the two major forces affecting a rocket getting off the ground: center of gravity, and center of pressure. 

Model Rocket Fins: Center of Gravity

Center of gravity is a key concept when understanding how model rocket fins work.

In simplest terms, an object’s center of gravity is the point within the object at the center of its mass and is related to an object’s balancing weight. 

Center of gravity is directly relational to an object’s weight.

For example, in a person, the center of gravity is slightly higher than a person’s waist because a person’s upper half is typically heavier than their bottom half. Likewise, a rocket with a nose cone and forward body that are heavier than its aft end will have a high center of gravity. 

A model rocket’s center of gravity is the point on which the rocket is perfectly balanced, tipping neither forward nor backward. 

Model Rocket Fins: Center of Pressure

Relative to a fin’s center of gravity, the model rocket’s center of pressure refers to the point at which all the aerodynamic forces act on the rocket.

While there are complicated calculus equations that can help you determine the center of pressure, there is another simpler way of determining its location. Here is a great video explaining the technique:

Once the center of pressure is determined, rocket design dictates that the center of pressure must be aft (rearward) of the rocket’s center of gravity in order for the rocket to have a stable flight without tumbling.

This is where the model rocket’s fins come into play. 

The rocket’s fins create a center of pressure on the rocket that is aft (rearward) of its center of gravity. That way when the rocket launches, it will launch straight up and down. 

Model Rocket Fin Shapes

Model rocket fins come in a few different shapes, also known as planforms. The planform of a rocket fin is not as important as its overall mass, and the span of the fin is large enough that it can generate sufficient lift force. 

Different shapes of model rocket fins offer different advantages and disadvantages.

A tapered swept tip fin shape might help to keep a rocket lightweight in design, but it is less stable than a clipped delta fin. Likewise, a trapezoidal fin might be a good choice for mid-sized rockets but may prove too bulky for micro models. 

These are the three common shapes are commonly found in model rocket fin design: 

  • Clipped delta fin: A streamlined fin with low weight; good for mid-sized model rockets.
  • Trapezoidal fin: Unique shape; good for mid-sized model rockets
  • Tapered swept fin: Aerodynamic design, potentially offers the furthest distance but less stable than other fin types

When building model rockets, these three fin shapes are the shapes you are most likely to find in prefabricated kits and rocket building blueprints, but the truth is that any shape of fin can be used as long as the balance between center of gravity and center of pressure is maintained and the fins don’t create too much drag. 

Along with the different types of planforms that model rocket fins can have, most model rocket fin designs also suggest adding an aerofoil shape to the fins, and aerofoiling fins can come in three different types:

  • Supersonic: Wedge-shaped leading edge, wedge-shaped trailing edge
  • Subsonic: Rounded leading edge, wedge-shaped trailing edge
  • Unsymmetrical: Chisel-shaped leading edge, chisel-shaped trailing edge

How Big Should Model Rocket Fins Be?

How large you make your model rocket fins is going to be largely dependent on the size of your model rocket. The fins must be proportional to the rocket’s mass if they are to help the rocket maintain a proper balance between the center of gravity and the center of pressure. 

A good rule of thumb to use to determine how large you should make your model rocket fins is as follows: 

Root (the length of the fin as it attaches on the rocket body): 2x the diameter of the rocket body

Span (the distance that the rocket fin protrudes from the rocket): 1.5x the diameter of the rocket body

Tip (the width of the fin’s tip): 1x the diameter of the rocket body

Depending on the diameter of your rocket, these proportions can be adjusted accordingly to ensure that you build a model rocket fin of the correct size for your rocket. As long as these measurements are maintained, the resulting model rocket fin should be proportional to the rocket body. 

Getting the size of a model rocket’s fins correct is important to making sure the rocket gets off the ground. Fins that are too large in proportion to the rocket body will create too much drag, while fins that are too small will not provide adequate stability during launch. 

How Many Fins Should a Model Rocket Have? 

A model rocket must have at least three fins in order to be stable and maintain a vertical position, but some model rockets feature four fins instead of three.

Four is the most fins you will see on most model rockets, as any more fins would only increase the rocket’s weight and potentially destabilize it. 

Having four fins on a rocket increases the rocket’s stability over three since it provides equal support from four corners that are equal distances apart, but it also increases drag and air resistance due to increased mass and weight. 

On the other hand, a model rocket with only three fins may be more unstable than one that has four, so it is a balancing act between drag and stability. 

Materials for Model Rocket Fins

Model rocket fins are made from a variety of different construction materials, including the following:

  • Wood: Wooden rocket fins can be cut in the home workshop, and come prefabricated from rocketry vendors for those who don’t want to bother with carpentry.
  • Plastic and fiberglass: There are many plastic and fiberglass model rocket fins available on the market, especially on those model rockets that are designed to visually emulate full-scale rockets, such as the Saturn V.
  • Cardboard: Cardboard is a good economical choice for model rocket fin design because it is stiff, lightweight, and easy to cut into precise shapes. 

Balsa wood, in particular, is a popular choice for those who design and build model rocket fins, as it is considered the strongest lightweight wood on the planet. Not only is it strong, it also resists warping very well. 

With the advance of 3D printing and other modern crafting techniques, people who make model rockets are also starting to turn to more sophisticated materials, such as lightweight polymers that can be 3D printed using a CAD design. 

While many beginner rocketeers try to use it in construction, plywood is not considered a good choice for constructing model rocket fins. It is both difficult to cut to the proper dimensions accurately and is structurally too dense for the level of strength it provides. 

Construction Methods for Model Rocket Fins

There are many model rocket kits available where the fins are preconstructed and ready to be attached to the rocket, but those who want to get more involved in the design of their rocket can opt to construct the model rocket themselves, including the fins. 

To build your own model rocket fins, you’ll need the following supplies:

  • Sandpaper (fine grit)
  • Adhesive/Glue (see our article on the best model rocket glue)
  • Modeling knife
  • Primer and paint (if you want to decorate your rocket)
  • Perforated balsa wood

One of the easiest ways to construct model rocket fins yourself is to buy perforated balsa wood that is already marked and perforated with the fin shape you’d like to use.

You can find balsa wood pre-marked and perforated in clipped delta, trapezoidal, and tapered swept shapes. 

Once you cut the shape of the fins out of the balsa wood with the modeling knife, use the fine sandpaper to gently smooth down the edges of the fins and give them an aerofoil shape. 

After the fins are polished, you can then use your primer to prime the wood, letting it dry completely before adding your top coat of paint. 

Attaching Fins to a Model Rocket

For lighter rockets (such as those that would be constructed with the balsa wood fins above), model aircraft glue is adequate for attaching the fins to the body of the rocket. Fins should be clamped to the body of the rocket long enough for the glue to harden so that a strong bond is formed between the fin and the rocket body. 

Model rocket fins should be attached to the rear of the rocket so that the rocket’s center of gravity is forward of its center of pressure.

A popular method for attaching fins to a model rocket is referred to as the “double glue method”, or a double glue joint. These glue joints are popular because they are strong. Here is how to attach a rocket model fin using the double glue method:

  • Lightly sand the entire rocket body, especially where the fins will be attached. This will allow the glue to both adhere better and dry faster, as well as giving the primer and paint a better surface to attach to if you intend to paint your rocket as well. 
  • Run a coating of wood glue or model airplane glue in a line both on the rocket body where you intend to attach the fins and on the edge of the fins themselves. 
  • Let the glue dry completely before proceeding. Once the glue is dry, lay down another line of glue on top of the glue you’ve already applied to the rocket body and fins.
  • Join the fins to the rocket body and jig in place until the glue is completely dry again. 

This double glue method leads to a stronger attachment than using a single layer of glue. 

Model Rocket Fin Placement

For accurate placing and alignment of your fins on the rocket body, many rocket builders use a tube marking guide (link to read reviews on Amazon) that helps ensure that all measurements for fin placement are precise and the fins end up exactly where they need to be. 

To make sure that the fins are placed where they’re supposed to be, you can also use a fin placement tool that will hold the rocket in place while you mount the fins. Estes has a good one available here (link to read reviews on Amazon).

Model Rocket Fin Failure

If a model rocket’s fin design fails, this typically causes a failure of the entire launch. When a fin cannot withstand the forces presented to it at launch, it will either break up or detach from the rocket entirely. 

The reason that the failure of even one fin ruins the entire rocket flight is that with an unbalanced fin system, the rocket cannot be accurately guided. The sudden decrease of air resistance in the tail region of the rocket causes it to loop wildly and can even rip the airframe apart in the process. 

Rockets Without Fins

What about rockets that don’t have fins, such as the SpaceX launch vehicles? These rockets use a form of thrust vectoring to keep the rocket steady and on trajectory.

In other words, instead of using fins to guide the rocket, the actual engine moves in direction to influence the rocket’s flight attitude.

There are many benefits to thrust vectoring, including the ability to perform vertical landings of the rocket, one of the many things that has made SpaceX famous.  

Model Rocket Fins Are Vital to Flight 

While they can come in a variety of different styles, sizes, and construction materials, no one with any kind of background in rocketry can deny the importance of strong, straight fins to stabilize a rocket body. 

Whether you build your own rocket from scratch or use a prefabricated kit, the fins of a model rocket are crucial to making sure your launch goes off without a hitch. 

How to Diagnose a Model Rocket Engine That Won’t Ignite


Nothing’s worse than setting up your brand new model rocket, and the engine refuses to ignite. No ignition, no flight. Big disappointment. Luckily, there can sometimes be an easy fix.

What do I do if my model rocket engine won’t ignite? If your model rocket won’t ignite, check the launch controller, the igniter, the igniter’s contact with the engine, or the engine. In order for a rocket to launch, there needs to be adequate electricity that lights the igniter that then ignites the engine, so diagnose the problem in that order.

If your engine won’t ignite at first, this can be easily diagnosed in a few steps.


Are you still using the standard Estes controllers for your launches?

We just built our own beautiful launch controllers that make launches SO much more fun, and we documented EVERY single step and item purchased and put it into a step-by-step course that teaches you how to do the exact same thing.

Click here to learn more about how you can build your own launch controllers!

Get the EXACT materials list along with easy to follow step-by-step instructions on how to build your very own launch controller and make launches 10x BETTER in our course: License to Launch

What do I do if my model rocket engine won’t ignite?

In order to troubleshoot launching a rocket, we need to break apart each step that must occur for a successful ignition and isolate each piece of that process to identify the problem. I like to think of things in the order in which they must happen, and diagnose sequentially from there.

As we covered in our article on how to launch a model rocket, we know the requirements for launch are a source of energy (usually a battery powered launch controller) to light igniters that then ignite the engine. Here there are already three different things that can be going wrong, so let’s diagnose them in that order.

Step 1: Check the Launch Controller

Typically model rockets are ignited using a battery-powered launch controller. For Estes rockets these are normally powered by AA batteries but models vary (for additional reading see our post on how many volts you need to launch a model rocket).

On the familiar (and generally trustworthy) Estes launch controllers (link to read reviews on Amazon) there will be a safety pin that needs to be inserted in order to activate the launch controller. If you push the launch button without first inserting the safety pin, the rocket will not launch.

Check the safety pin and make sure the light illuminates indicating there is continuity in the electrical connection. Sometimes this bulb can burn out so you won’t have a visual verification, but generally it works so if the bulb does not illuminate, try first switching out the batteries of your launch controller to see if that fixes the problem.

If using an older launch controller, the bulb might not work but that does not necessarily mean the connection does not work.

I have also read that regular non-reusable batteries have slightly more voltage than comparable rechargeable batteries. I don’t think this is enough to make a difference in a launch, but if low batteries are the suspected cause it is easy to simply swap batteries and see if that is the issue.

Secondarily, try wiggling the safety pin in the key hole, as there could be something blocking the connection.

If you are using a launch controller where the electrical wires are manually connected/disconnected to the launch controller, ensure that they are inserted properly (the Estes controller has the electrical wires already connected internally).

Telltale Sign Your Launch Controller is the Issue

One clear way to know if your launch controller is the issue in a failed ignition is if your igniter is still unburned after the failed launch attempt. This (more than likely) means that it never received the electricity needed to ignite. This could be an issue with the electricity in the launch controller itself, or the connection either within the launch controller or the connection to the igniter. Try re-adjusting the clips connecting to the igniter and ensure one didn’t fall off or didn’t have a loose grab on the igniter wire ends.

If all of these look good and you know you should have the required electricity, move onto diagnosing the igniter.

Step 2: Diagnose the Igniter

If you have good electricity in the launch controller, the next step is to check the igniter. The igniter is heated by the electrical system and rapidly catches flame to then ignite the actual engine.

First, make sure the electrical clips are properly connected to the ends of the igniter wire. Sometimes they can slip off and not be fully connected which could jeopardize the ignition. Also make sure they are clean of residue. Lastly you also want to make sure the clips are not touching any other metal (such as the blast deflector plate) which could interfere with the electrical current needed to light the igniter.

Next, pull the igniter out of the rocket and see if it is burned or still unused. If it did not ignite but you are certain your launch controller is working, the issue is either in the connection to the igniter, or the igniter itself. If you are positive your connection is sound, try another igniter.

If you need a refresher, here are the steps to properly install a model rocket igniter:

  1. Cut through the tape that is separating the igniters but does not remove the tape.
  2. Separate a plug from the strip of plugs.
  3. Put the igniter into the engine. The igniter needs to touch the propellant. Make sure you don’t bend the igniter.
  4. Put your plug into the engine nozzle (keep the wires straight).
  5. Firmly push the plug into the engine
  6. Bend the igniter wires back and form the leads into a U shape. Make sure you hold down the plugs with your thumb as you bend the wires.
  7. Examine your micro-clips to make sure they’re clean. Attach your micro-clips to the igniter wire leads and arrange the clips, so they aren’t touching each other, the metal blast reflector, or the launch pad.

If after a failed launch you remove the igniter and has combusted but the engine did not ignite, then it was likely either because the igniter was not installed properly and wasn’t able to ignite the engine, or the engine could be faulty.

Step 3: Diagnose the Engine

If you are certain your launch controller is providing energy, and your igniter is lighting, but the engine won’t ignite, then the issue is likely the engine itself (assuming the igniter was installed correctly… see above).

Estes rocket engines have a very long shelf life (see our article on how long does a model rocket engine last), and so if they were stored in a cool dry place, shelf life likely is not the issue causing the engine to fail to ignite.

If you left the engines in the trunk of your car for the last year in a warm climate and experienced extreme temperature changes on a daily basis, then engine erosion and degradation could be suspect. Otherwise this probably is not the issue.

This might sound obvious, but also make sure the engine isn’t visibly damaged or clogged with foreign objects. If you went through all of these steps and the rocket still won’t ignite, then try a different engine.

In my experience, a failed launch is usually because of electrical problems or igniter installation or connection. I haven’t personally experienced a rotten engine that wouldn’t ignite despite all of the other components operating properly.

Conclusion

While these are rockets after all, diagnosing a failed model rocket launch doesn’t have to be “rocket science.” The best way to diagnose is just to go through each of the components of the rocket, the engine and igniter attachments, and launch controller / electrical system to make sure they are all working properly. Often times it is an incorrect installation of one of these components that can quickly be fixed and your launch can resume as planned.

Always exercise extreme caution when dealing with and troubleshooting rockets and their associated components. These are often highly flammable materials you’ll be working with that need to be treated with caution and respect. Stay safe out there!

Build Your Own Launch Controller

Don’t forget! You can ditch the stock controllers and confidently build your own from scratch using our step-by-step instructions and exact materials list! We promise this will make your launch experience 10x better, and using our course License to Launch you can be 100% confident you’ll be able to finish this project and be super proud of what you’ve built! Here’s a sneak peek below.